


It was time for me to put the designing book away for a while and work on a personal project. Just something fun, for myself and which I didn’t have to think out. And there was just a perfect thing in my head which suited all these things. Last year Johanna from Mijocrochet did a marvelous thing to my Solstice pattern. She used a part of it and turned them into the most amazing trivets. They are already made by so many now but here you can find the tutorial she made about it.
I feel like Johanna and I did become sort of crochet buddies over the last year as we really love each others work and help each other out where possible. It was more than wonderful to see how she found a new way too use one of my patterns and I feel it is the ultimate way of designers collaborating and making each other stronger. And so i had an idea for a longer time to do the same thing for her. I only had to find a moment to do it. And guess what ?….this was the perfect timing.
I also spotted a really nice yarn for the idea I had in mind. At the moment Hobbii.com is really an upcoming online yarnstore and they had exactly the right colors I wanted to use.

These are Hobbii’s Twisters. For the pattern I used a double thread so from both colors above i ordered two. The blue version is the Cotton Kings Twirl Deluxe in colorway Whitewater Turqoise and the brown version is the Cotton Kings Twirl Deluxe in colorway Morion Smokey Quartz. Again, I used from both colors two as i worked with a double thread. You could also use just one single thread, but the throw would be much more loose and less textured. So far the yarns i used.
As I already told i would return the favour to Johanna ( Mijocrochet ) by doing a same thing to one of her patterns. And i had this one already for a while in my mind. It is the V for Vintage shawl from Mijocrochet. You can buy the pattern in her Ravelry store . And with writing that down I have to say that all copyright and terms belong to Mijocrochet, even this modification of the pattern. If you like to make this V for Vintage throw you need to have to buy the pattern cause without it isn’t possible to produce. The original V for Vintage shawl looks like this :

A beautiful piece of art which holds such elegance. As a shawl this pattern is already worth gold, but if you have this pattern you can now expand your skills by making a throw out of it as well. It is always fun to use a pattern for more than just one purpose right ? So next I wrote down a tutorial how to turn this pattern into a throw, of course i only pointed out directions as i can’t reveal the pattern online. My advice is when you like to make this throw, just take the original pattern and lay these notes besides it. Together they will work out fine.
V for Vintage Throw tutorial :
Materials needed :
- 2 x 2 balls of Hobbii Twister Deluxe yarns which comes in balls of 250 grams with a length of 1000 meters. I used a double thread and so you need 2 balls from 2 colorways. The exact used colorways can be found in this tutorial in the part where I wrote something about the yarnchoices. You can also choose to use just a single thread, your work only becomes a bit more loose and less textured.
- A crochet hook 5,0 mm for the double thread version, a 3,0 mm for the single thread version.
- blocking materials.
Finished Size :
The finished size after blocking with a double threaded yarn and crochet hook 5,0 mm will be approx. 160 cm x 160 cm / 63 inches x 63 inches.
Some other information before starting :
- You need the V for Vintage pattern to create this throw.
- All stitches used in the pattern are described in the pattern or on Mijocrochet’s website.
- In the tutorial I just give directions how to rearrange Rows or stitches, i don’t name everything to respect copyright rules of the original pattern.
- If u use the same colorways I used in my throw, you start of by using the blue Twirl from the inside to the outside, once it is totally used up you switch to the brown Twirl which you start from the outside to the inside. In this way your colors will blend the best.
The Tutorial :
Begin with skipping Row 1 of the pattern and as an alternate beginning we start of by making a magic loop.
Row/Round 1 : CH3 ( does not count as a stitch ), ( make 1DC – CH1 – 1DC – CH2 ) 4 times in the magic loop. SS to first made DC to connect the Round.
the ch2-spaces will become the corners of your throw and will be exactly the same as the tip out of the pattern.
Row/Round 2 : You work Round 2 just the same as Row 2 is described. You work along the sides making the dc’s/puff stitches as described in the dc’s and you work the ch2-spaces just the way the tip is described. If you follow these step you can just crochet along this Round. If you reach the beginning point you just ss to the third chain of the ch3 you began with.
Row/Round 3 : start off by ss to the next ch1-sp. You can just follow along Row 3 as it is described only you can skip the dc made after the ch4 at the start of the Row. After that you can just work Row 3 along making the stiches in the ch1-sps and working the ch2-corners exactly the same as the tip. If your worked your way around you can connect the Round by making a ss to the third ch of the ch4 you began with.
Row/Round 4 : To start this Round you can just begin like Row 4 is described working along to the ch2-corner which you work just like the tip is described, after that you just continue the same described sentences above over all sides and corners. Don’t look at the end part of this Row as it won’t work for this throw. You just work along sides and corners and will reach the beginning point. Once your there ss into the third ch of the first ch3 you started with.
Row/ Round 5 : See Row/Round 3.
Row/ Round 6 : See Row/Round 4.
Row/ Round 7 : See Row/Round 5.
Row/ Round 8 : To start this Round it is really important you ss to the next dc on the side, if not your stitches won’t fit the right way. To start this Round you can just begin like Row 8 is described working along to the ch2-corner which you work just like the tip is described, after that you just continue the same described sentences above over all sides and corners. Don’t look at the end part of this Row as it won’t work for this throw. You just work along sides and corners and will reach the beginning point. Once your there ss into the third ch of the first ch3 you started with.
Row/ Round 9 : Start of this Round by ss to the next ch1-sp in the tip of the small fan. From this point out you can just follow along Row 9 as it is described. Just working the sides as described and the ch2-sps as the tip. Only skip the last part on the Row where you need to make a dc in the third ch, just crochet along to the beginning and once there make a ss in the third chain of the ch6 you began with.
Row/Round 10 : You work Round 10 just the same as Row 10 is described. You work along the sides making the dc’s/puff stitches as described in the dc’s and you work the ch2-spaces just the way the tip is described. If you follow these step you can just crochet along this Round. Only skip the last part of this pattern where you make a puff stitch in the third chain, instead of that just crochet along to the beginning point. If you reach the beginning point you just ss to the third chain of the ch3 you began with.
Row/Round 11 : See Row/Round 7.
Row/Round 12 : See Row/Round 8.
Row/Round 13 : See Row/Round 9.
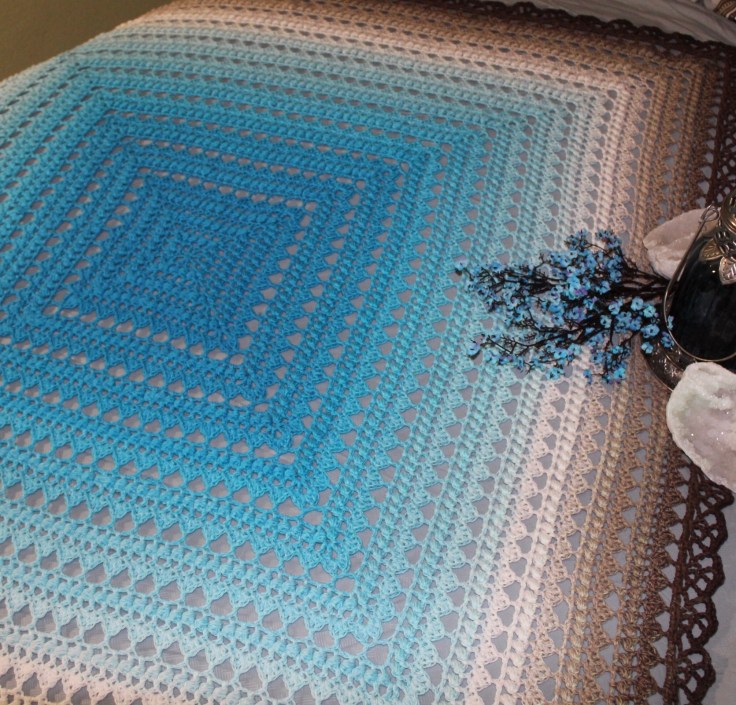
As the pattern describes after these Rows/Round just continue repeating 11-12-13 for as long as it is needed. Here is a picture up to Round 13 :

I repeated the three Row/Rounds for 10 times to reach the border part.
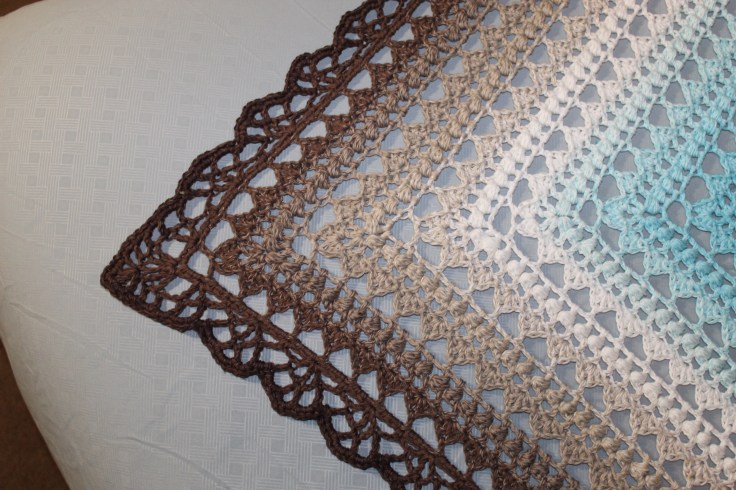
I give directions for the border just as above for the Rounds. However, I made up my border to Row/Round 4 as my yarn was used up. I also changed Row/Round 4 as i made all stitches described just as sc’s to save some yarn. This is why my border can look slightly different from the original. However, i describe it just the way you could normally make it.
Row/ Round 1 : Start off by ss to the next ch3-space before you begin on this Round. Skip the first part of the pattern where you have to make 2sc’s in a dc. After that you can just crochet along the side to the next ch6-corner which you work exactly the same as the tip. Repeat these two sentences for the entire Round and skip the last part of Row 1 as you don’t need to make 2sc’s in a dc but just crochet along to the beginning point. Once you reach it ou can make a ss in the first made sc to connect the Round.
Row/Round 2 : Start off by ss to the next ch1-space before you begin on this Round. Skip the whole first sentence in the pattern up to “make 1sc in next ch1-sp”. Make this sc and from there you can just follow along making the side and work the corner just the way the tip is described. Repeat these two sentences for the entire Round and skip the last part from the ch2 as it is not needed. Just make the sides the same and the corners like the tips. Once you reach the beginning point you can make a ss in the first made sc to connect the Round.
Row/Round 3 : Start off this Round by skipping the whole first part making stitches in the trebles as you don’t have any to start with. Instead ss to the next dc. Ch3 which will be your first dc. Pick up the pattern after it from the Ch3 which starts in the ( ) . So actually you start off by making 6 chains. From this point you can just crochet along the side and corner just like the tip. Just keep repeating those two things. Skip also the last part on the Row where you need to make again stitches in the trebles as you don’t have them, you just crochet along to the beginning point. Once your there you end with a dc, make a ch1 and skip the ch2-sp/1sc/ch2-sp. Connect to the third chain with a ss.
Row/Round 4 : Start off this Round by skipping the whole first sentence in the Row. Start with skipping a dc , {…..and so on in the pattern. From that point you can just crochet alon the side and make the corner just as the tip. Repeat those two things and skip the end part of this Row as well just like the beginning. Just crochet along the sides and corners to the beginning point. Once you reach it you can ss into the first made hdc to connect.
Row/Round 5 : This Row speaks for itself. Just make ss in the stitches named and skip sts as described.
And that’s all ! The most important thing to keep track off in the more further Rounds is you edit the beginning and end points of Rows as normally you reach and end point when making the shawl, with the throw this is not happening and u just use the repeat parts out of the Rows to work your sides. The corners are the most easy ones as they are just the same as the tip. Each tip and repeat part will be made 4 times on the throw.
Block your finished throw to make it even better looking.
I hope it all makes sense a bit as it is really not that hard once you have done the first Rounds. Just get the vibe and you can crochet along watching some Netflix : )
In the end you will have a beautiful throw over your bed or chair.

At last note and again….all copyright to this pattern and tutorial are with Mijocrochet. She owns this pattern and this is just a creative way of giving a twist to the pattern. If you’ll find it hard to understand the tutorial, please just try it and use your creativity, I can’t share a large explanation guided by photos or anything else as this is a paid pattern and i don’t want to share too much of it out in the open. I hope you respect this. If you like to work on the throw and you might have a question about it, feel free to send a message…however i could ask to show off a wip or pattern page to validate you have purchased the pattern. Just to prevent this pattern is leaking out into the world, as Mijocrochet really deserves some credits and a little fee for her work.
And of course I want to thank Johanna for giving me permission to do this, working on her pattern and give it a small change. It feels great i can return a favour back which she gave me already and i hope in the future more of this collaborations will happen. Between us, with others…anything is possible ! It is just great seeing others let their creativity flowing over your own creations. Again…thanks !


Geef een reactie