
Here is a little tutorial with all tips and tricks to master the technique of crocheting a graphghan. This technique/tutorial might be handy when making patterns like : Freddie Mercury, Salvador Dali or Baby Groot.
For an afghan pattern it is really important to write down some rules you need to apply. These rules are essential to make this pattern to a success as crocheting a “graphghan” is not a regular way of crocheting. The stitches itself yes, but the colorchanging can make this an advanced pattern. So i shall try to explain some things before you begin.
- first of all this pattern is made out of sc’s, if you are done crocheting a Row you turn your work and continue. So the pattern is worked front and back from one side to the other. If you turn you use a ch1 to turn.
- before you begin it is a real important note to make small balls of yarn from each color and more then one of each color. A good way to do this is make small pieces of cardboard and wind some yarn around it. As you will have sometimes over 12 threads of yarn colors on your work it really helps working with smaller balls so it is easier to prevent them from becoming one big mess of threads. Another reason is when you have the same color on a Row twice, but both colorfields are not close to each other, it is better to work them both seperately with two small balls of the color instead of carying the thread along your work the whole Row. Here is for example a picture of how you could use more small balls together combined without the need to carry same color along the Row.

In the example you see how an order of different colored small balls could look into a Row. And as you see you may encounter more parts of the same color in a Row. Take the black from example. If you would use one big ball of black you had to crochet the first black part, after you had finished the first part you had to carry along the black thread along the light purple – red – light purple part. Way too complicated and your work would full of carried thread on the backside. So instead of that we just make a few balls out of one color and for example two of them on a same Row. The only downside on this technique is you have a lot of threads and small balls attached to your work. Sometimes it gets a bit messy but it isn’t too hard. And if you feel like all your balls have become one big mess, just cut the threads and start fresh and attach them again. More ends to weave in but it makes it more comfortable to work with. So that is using colors in a Row. But another thing is changing to another color on a Row. And this is something different in a Right side Row or a Wrong side Row. So i have tried with a photo tutorial to show you how to do this on both sides.
Changing to a new color on the Right side of the Row :
Changing a color in this pattern isn’t hard, you just need to know how to do it. Let’s say you just crocheted a colored part in the pattern. Crochet up to the last stitch but don’t finish it. You pick up the loop for a new stitch with the color you work with, but instead of finish it with the same colored thread, you take the color which comes next and you finish the stitch with that color. Here is an example :
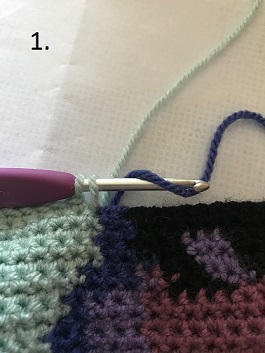

( photos can look slightly different as i am a lefthanded crocheter)
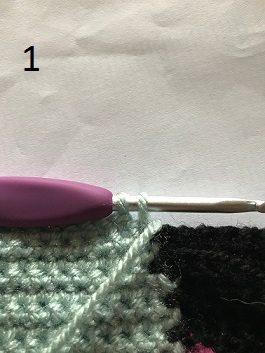
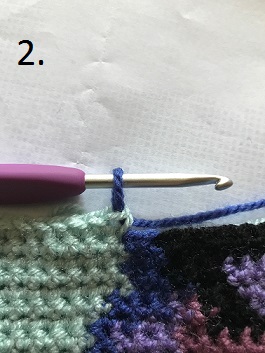
Above you see on Photo 1 you started the last stitch with the base color. Instead of finishing off that last stitch with the same color, you pick up the next color which in this case is dark purple and you pull it through this last stitch of the base color ( photo 2 ). Doing it this way you’ll start off the right way on a next color instead of seeing a loop of the base color on the first dark purple stitch. This is what you do with each color change on all Rows on the Right side of the pattern.
Changing colors on a Wrong side of the Row :
If you have finished a Right sided Row, turned and are working on a Wrong sided Row, colorchanges are a bit different. You pull up the loop of a new color on the last stitch of the current color just the same as on a Right side Row. The only thing you need to maintain is to hold all threads on the front side of the yarn, except the one you work with. Before you pull through a loop of a new color through a last stitch of the color before you first put the thread of that color towards the front of your work. Let’s give an example :
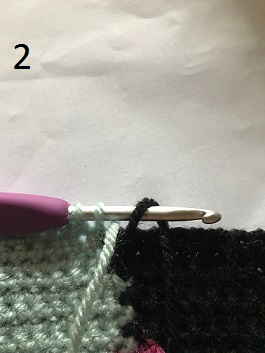
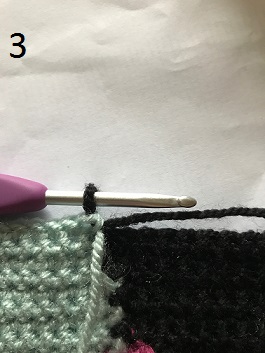
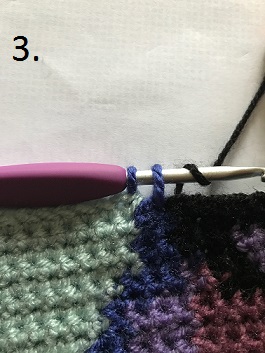
On this example you see a colorchange on the wrong side of the work. On photo 1 you see how you reached the last stitch of a color, in this case it is the base color. On photo 1 you can see that before you pick up the loop for a new color, you first pull your thread of the base color towards you, to the front of the work. Next you pick up the loop of the next color, which is in this case the black yarn. On Photo 3 you can see how the new color is pulled through and you can continue. Of course you work with the black thread towards the back because if not you never could make a stitch. But when you would be done with black and would have to change, you first would pull your black yarn thread towards you and after that you pick up the next color, which is also hanging in front of you.
This way you work all colorchanges on the Wrong sides of the pattern.
Another thing with the color changes is that you encounter parts where there is just one stitch of a new color. This holds a lot of changing in a small part of a Row. Here is an example of how to do it :

( photos can look slightly different as i am a lefthanded crocheter)
On Photo 1 and 2 you just see a normal color change on a Right side. But if in Photo 2 there is only one stitch in a new color to make, you also don’t finish this stitch off, but again pick up the new color of the next part in this stitch. A lot of changing in just one stitch, but not that hard.
Changing colors on a Row with a few stitches between them :
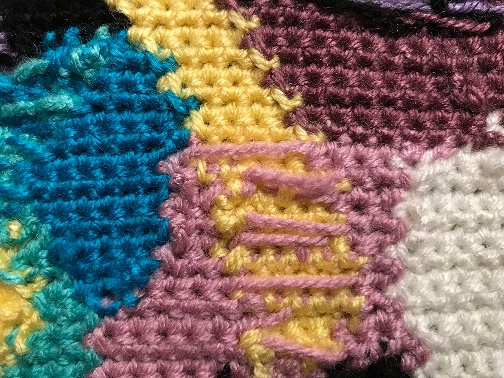
If you encounter a part on a Row where there are just two or three stitches from another color between the same color, you can just carry along the color along the back. Just as you see on the photo, the yellow part is a small part between the two pink parts, this is a easy part to just overlay the pink thread to the next part. But beware, this work to a maximum of five stitches. Larger parts between them will become to large and your thread would get loose or tighten up your work. So for small parts you can use this technique, on larger parts you just take two small balls of the same color.
