

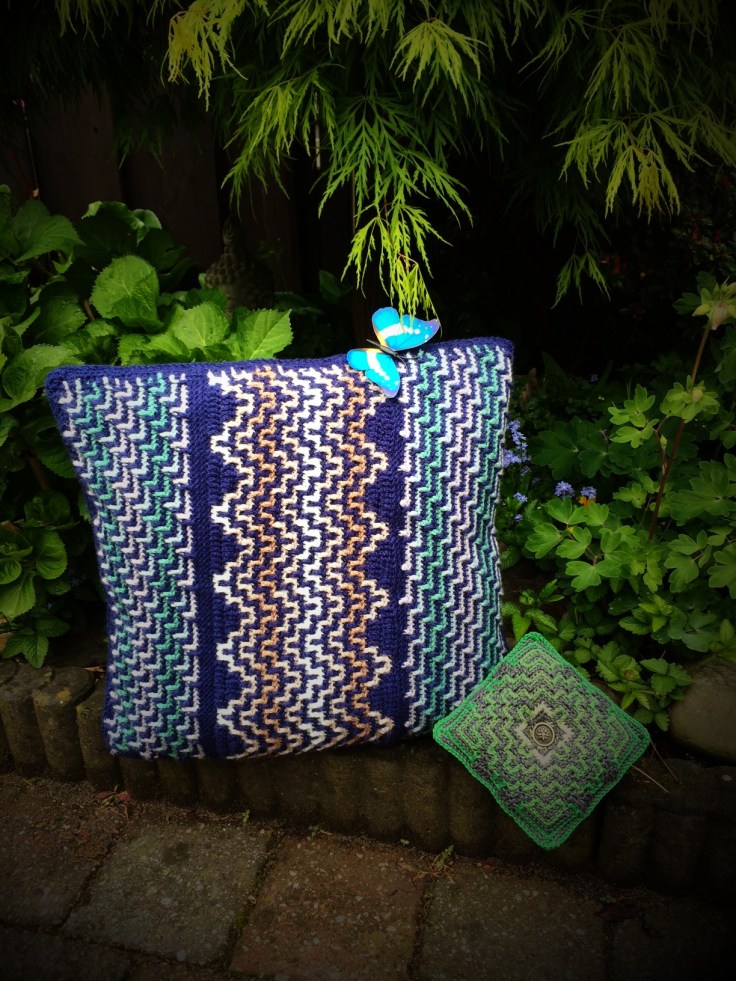
Here’s a little side-walk from the Terrazzo tiles for now…but actually it has anything to do with it too….i shall explain a little bit. When i took the request from Tinna to work on her Terrazzo afghan i also took the request to do something with her Mosaic purses pattern. But i am not the type of guy that likes to have purses for any random thing…although a nice one for putting all your hooks in would be great. But…..i did came up with another idea….actually turn this pattern into a pillow.
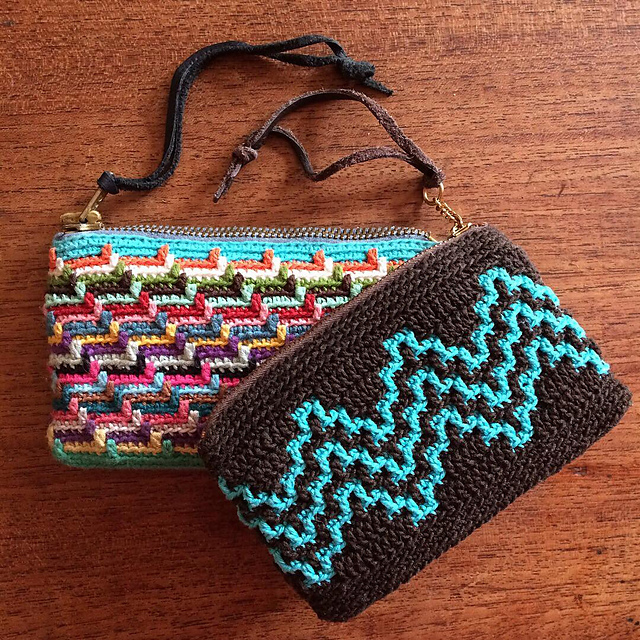
The original purses you see above, as you will see there are two kinds of structures used. The colored one is the striped mosaic and the other one is the wave mosaic version. I combined those two in the pillow i came up with. As this pattern is one to buy i cannot give a free pattern away here, but i can give you directions to use when you want to make the pillow. So that’s what i will write down for you in this post.

Pillow modification for the Mosaic Purses pattern by Tinna Thorudottir Thorvaldar :
Yarn used : i used Scheepjes Colour Crafter acrylic yarn in 7 colors
Color A : 2005 Oostende ( main colour for the front side of the pattern ) you need around 70 grams of yarn
Color B : 1203 Heerenveen ( you need 20 grams of yarn for this one )
Color C : 1820 Goes ( you need 15 grams of yarn for this one )
Color D : 1725 Ameland ( you need 20 grams of yarn for this one )
Color E : 1005 Barneveld ( you need 20 grams of yarn for this one )
Color F : 2010 Hasselt ( you need 25 grams of yarn for this one )
Color G : 1064 Veenendaal ( you need 20 grams of yarn for this one )
for the back part of the pillow i used a random color as it is a one colored side, you can choose any color you like from B to G, i used color C for it and you will need 60 grams of yarn for it.
Hook size used : 4.0 mm
Notes that are important to know :
- when working on the pattern, all sc’s are back looped besides the first and last of each row. Also every row is worked on front side so you will attach and end every color at each row.
- as i didn’t have a zipper the size of a pillow i turned the pattern in a regular pillowcase without a zipper. As the pattern is also designed for a zipper feel free to use which way you choose.
- If you use the no zipper version i made up you have to leave the ch1 in the begin and end out of it. Then you just make every row a sc at the begin and a sc at the end. Between the sc’s you repeat the repeat part of the pattern as described and remember to do it in back loops.
- I used a pillow with a size of 40 cm x 40 cm.
- all terminology is in US/European.
Instructions :
Using yarn color A
Foundation row : ch 75 and make a sc in the second ch from the hook. Then make 1 sc in the next 73 ch. Fasten off thread. ( 74 sc )
Row 2 and 3 : Attach yarn, ch1 and make a sc in the first st. Make a sc in blo of the next 72 stitches. Make a sc in the last st and fasten off thread. ( 74 sc )
Now we use the first pattern called the stripe mosaic. Just to be clear, you will find it in the pattern of the mosaic purses. Just work the pattern from row 4 to 9. You use colors B,C and D for this and work it in following order :
row 4 and 16 : color B // row 5 and 17 : color A // row 6 and 18 : color C // row 7 and 19 : color A // row 8 and 20: color D // row 9 and 21 : color A // row 10 and 22 : color D // row 11 and 23 : color A // row 12 and 24 : C // row 13 and 25: color A // row 14 and 26 : B // row 15 and 27 : color A
When using no zipper you will not make the ch’s that are described in the pattern but make the rows as following example :
( ch1, 1sc in first st – you will make the repeat part of the row 12 times – 1 sc in last st – fasten off thread )
As every repeat part in every row contains 6 stitches you will repeat the whole part for over 12 times in every row.
Work over row 4 – 9 for 4 times in color combination as described. In total you will crochet 24 rows of the pattern starting on row 4 of the pattern. To keep it simple i just counted through the row number although you will work from row 10 again the part of 4 to 9 again.
Using Color A – make 3 rows of ( 1sc – 1sc in blo of next 72 st – 1 sc in last st )
Now we are gonna use the other pattern that you will find in the mosaic purse pattern called the wave mosaic. This is a bigger pattern with repeats of 12 stitches so you will make 6 repeats on each row. The color combination on this pattern is easier. The color combination for this one is :
- 1 row with color E
- 1 row with color A
- 1 row with color E
- 1 row with color A
- 1 row with color F
- 1 row with color A
- 1 row with color F
- 1 row with color A
- 1 row with color G
- 1 row with color A
- 1 row with color G
As you can see the contrast colour stays as it is, the other color switch continues when you used it in 2 rows. Just keep going on with this order and you will end this pattern with a second row of color F.
Just work through the pattern as described from row 4 to 12. Just work the rows as the following example :
( ch1 – 1 sc in first st – work the repeat part of the pattern 6 times – 1 sc in last st – fasten off thread )
After you worked through the first 12 rows, repeat row 9 – 12 for about 4 times. Once you did this you can make the end part of rows 13 – 19 as the pattern describes.
Using Color A – make 3 rows of ( 1sc – 1sc in blo of next 72 st – 1 sc in last st )
Now you work the same way up with the stripe mosaic pattern as you started. So you will do :
Just work the pattern from row 4 to 9. You use colors B,C and D for this and work it in following order :
row 4 and 16 : color B // row 5 and 17 : color A // row 6 and 18 : color C // row 7 and 19 : color A // row 8 and 20: color D // row 9 and 21 : color A // row 10 and 22 : color D // row 11 and 23 : color A // row 12 and 24 : C // row 13 and 25: color A // row 14 and 26 : B // row 15 and 27 : color A
When using no zipper you will not make the ch’s that are described in the pattern but make the rows as following example :
( ch1, 1sc in first st – you will make the repeat part of the row 12 times – 1 sc in last st – fasten off thread )
As every repeat part in every row contains 6 stitches you will repeat the whole part for over 12 times in every row.
Work over row 4 – 9 for 4 times in color combination as described. In total you will crochet 24 rows of the pattern starting on row 4 of the pattern. To keep it simple i just counted through the row number although you will work from row 10 again the part of 4 to 9 again.
Using Color A – make 2 rows of ( 1sc – 1sc in blo of next 72 st – 1 sc in last st )
Then crochet the last row as the last 2, except you don’t have to make back loop stitches. So you can crochet 74 normal sc’s. Fasten off yarn.
Now work away and weave in all the ends on the sides of your work. Take color A and attach yarn on one of the sides you just weaved in the ends. Just crochet hdc’s along the whole side and at the end of the side, ch1 and turn. Crochet another row of hdc’s over the first one. Fasten off yarn. The number of hdc’s you crochet isn’t that important as you can randomly skip one with the joining later on.
Do this part also on the other side of the weaved in ends.
Then it is time to make the back part. You can choose to make another one of the above to match the first which is fine, although i made a no pattern side for the backside. As described on the colors you can choose a random color from B to G which you like.
ch 62 and make a dc in the third ch from the hook. Make a dc in the next 59 ch’s.
- ch 2 and make a dc in the first st ( the 2 ch will not count as a dc for all rounds ), make a dc in the next 59 stitches.
Just work along 36 rows of 60 dc’s . Mine came out perfectly at 36 rows but i can imagine every hand will crochet different so just check the size of it by laying it over the front part. If it just a little smaller than the front part it is perfect in format.
When you finish it, take color A and attach it in a corner. Crochet with hdc’s all around the square and make in every color a hdc-ch1-hdc. When done fasten off yarn.
Make sure to work away any thread or loose end for now if you still have them on.
Lay the front and backside you now have on each other with the insides to each other, so the good sides will be to the outside which you see. Fasten on color A and just start combining the two sides to each other by making sc’s through the front and back parts. Make sure you crochet them equally so you will not end up with bubbly joining. A good way to tackle that is to connect the pieces together with stitchmarkers before you start joining. You can best start in a corner and when in a corner just work 3 sc’s. When you have done 3 sides of the 4, shuffle in the pillow and continue joining the last side. Do this one tight and clean as it may be a little tougher cause the pillow is now in. When finished join with a sl st in the first st and fasten off yarn. Weave in any ends and there is your pillow !

Again, you will need the pattern of the mosaic purses from Tinna Thorudottir Thorvaldar which you will find here. And please feel free when you make this pillow to add your project on Ravelry. I made a pattern page up under the name Mosaic Purse Pillow. You can also send me anytime a message to show your finished pieces and i will feature it here !
All rights of the pattern are owned by Tinna, the modification of the pillow are mine.

Geef een reactie